
The fastest way to ruin a good security system is to let it talk too much. Alarm.com can tell you about nearly everything — every door, every arming event, every clip — and if you leave it all on, you’ll be swiping away alerts within a week and missing the one that matters. Here’s how notifications actually work, the six official types and when each earns its keep, and how to silence the rest.
Where notifications live
On the customer website: sign in at your Alarm.com portal and choose Notifications in the left menu, then + New Notification. In the app: menu → Notifications, then the +. Every type below follows the same recipe from there: pick the type, name the rule, configure its specifics, choose recipients (push, text or email — different people can get different alerts), save.

The six core security notifications, and when to use each
- Alarm — fires on an actual alarm event. Non-negotiable: on for every adult, by push and text. This is the one that matters. Alarm.com’s reference
- Arming Reminder — “it’s 10:30 PM and the system isn’t armed.” The single best habit-builder the platform offers; one per household, evenings only. Reference
- Arming Event — who armed or disarmed, and when. Scope it to specific user codes for a quiet push when the kids get home from school or the cleaner arrives — and leave your own code out of it. Reference
- Sensor Left Open — a door, window or garage open longer than a duration you set. Garage door plus 10–15 minutes is the classic; you’ll never heat the neighborhood overnight again. Reference
- Sensor Activity — fires the moment a chosen sensor opens or a motion activates. Powerful and noisy: right for the safe, the liquor cabinet, the shop door, the medicine drawer — wrong for the front door, which would ping you forty times a day. Reference
- No-Show Alert — the inverse of everything above: it tells you when a user code was not used by a certain time. The latchkey-kid special — if their code hasn’t disarmed the panel by 3:45 on a school day, you know. Also quietly excellent for an older relative living alone or a business that should have opened by 9. Reference
These six are the security backbone, but not the whole catalog — depending on your equipment you’ll also find notification types for cameras and video, locks, garage doors, thermostats, geo-fence arrivals and departures, and system trouble alerts (low battery, power loss, sensor malfunction). The same recipe applies to all of them: pick the type, scope it tight, choose who hears about it.
Our recommended starter stack
For a typical family home: Alarm to every adult (push + text) · one evening Arming Reminder · Sensor Left Open on the garage at 15 minutes · an Arming Event scoped to the kids’ codes · and a No-Show Alert on a school-day schedule if anyone comes home to an empty house. Five rules, near-zero noise, and every one of them tells you something you’d act on. Add Sensor Activity only for the specific drawer or door you genuinely want guarded.
Taming the noise
- Edit or delete freely — every rule in the Notifications list can be re-scoped, rescheduled or removed. If an alert hasn’t been useful in a month, kill it.
- Camera notifications belong to rules — if the doorbell pings you for every passing car, that’s fixed in the camera’s Video Analytics rule, not here. Our doorbell analytics tutorial covers it.
- Use schedules — most types accept time windows. Arming reminders only matter at night; sensor-left-open mostly when you’re asleep or away.
- Route by person — alarms to everyone; operational chatter to whoever actually acts on it. Recipients are per-rule, so use that.
Not getting pushes at all?
Push delivery depends on the phone allowing it: check the phone’s notification settings for the Alarm.com app, make sure the app is signed in (a signed-out device silently drops pushes), and confirm the device is listed as a recipient on the rule itself. If texts stopped, verify the phone number under your login’s contact info.
Want it dialed in for you?
If we installed your system, this is part of the deal — message us or call (928) 843-7767 and we’ll set your notification stack up with you in ten minutes. If your current company won’t, we take over Alarm.com systems across Utah — month-to-month, with people who answer. More in the tutorial library.
Out of the box, a video doorbell records motion — which means cars, cats, tree shadows and every headlight sweep at 2 AM. Video Analytics is the feature that fixes this: the Alarm.com Premium Video Doorbell (ADC-VDB775) can tell the difference between a person, a vehicle and an animal, and only record — and only notify you — for the ones you care about. Here’s how to set it up properly.
The two rule types, in plain English
Analytics rules come in two shapes, and picking the right one matters more than any other setting:
- Ground Zone — draw an area, and the rule fires when a target lingers inside it. Use this for the porch itself: a person standing at your door, a package being delivered.
- Tripwire — draw a line, and the rule fires when a target crosses it. Use this for the walkway or driveway edge: someone approaching the house, a car pulling in.
Zones and tripwires can overlap, and the doorbell supports up to three rules at once — a porch ground zone for people plus a driveway tripwire for vehicles is the classic combination.
Setting up a rule on the website
- Sign in at your Alarm.com portal and click Video
- Click Recording Rules, then Add New Rule, then Video Analytics
- Select your doorbell, choose Ground Zone or Tripwire, and set the scene to Outdoors
- Draw the zone or line on the live view, then choose what should trigger it: Person, Vehicle, and/or Animal
- Save — the first rule kicks off an automatic calibration, so give it a little while to settle in

Setting up a rule in the app
- Open the Alarm.com app and tap the Video icon
- Tap the gear (settings), then Recording Rules
- Tap Add, then Video Analytics, and follow the same steps — camera, rule type, scene, drawing, detection types
The settings that make or break it
- Detection types — for a doorbell, start with Person only. Add Vehicle on a driveway-facing tripwire if you want arrival alerts. Skip Animal unless you actually want raccoon documentaries.
- Timeframes — rules can run at all times, on a custom schedule (say, only overnight), or while on vacation between dates. Most people run the porch rule 24/7 and save schedules for driveway rules.
- Exceptions — the clever part: a rule can pause itself when the panel is disarmed or when your phone’s geo-fence says you’re home, so you’re not notified about your own family walking in. Optional exit delays keep it from firing while you leave.
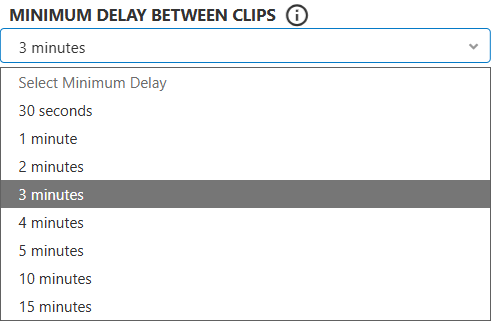
- Minimum delay between clips — the throttle. If your porch is busy, a couple of minutes between recordings saves storage and sanity.

Notifications (and Familiar Faces)
Each rule can push its own notification, filtered by detection type and with an optional thumbnail attached — so the alert itself shows you who’s there. The VDB775 is also one of the few Alarm.com cameras that supports Familiar Face Analytics: teach it household faces and it can tell you whether the person at the door is someone it knows or a stranger. That single filter turns a noisy doorbell into a quiet one.
Going further: deterrence
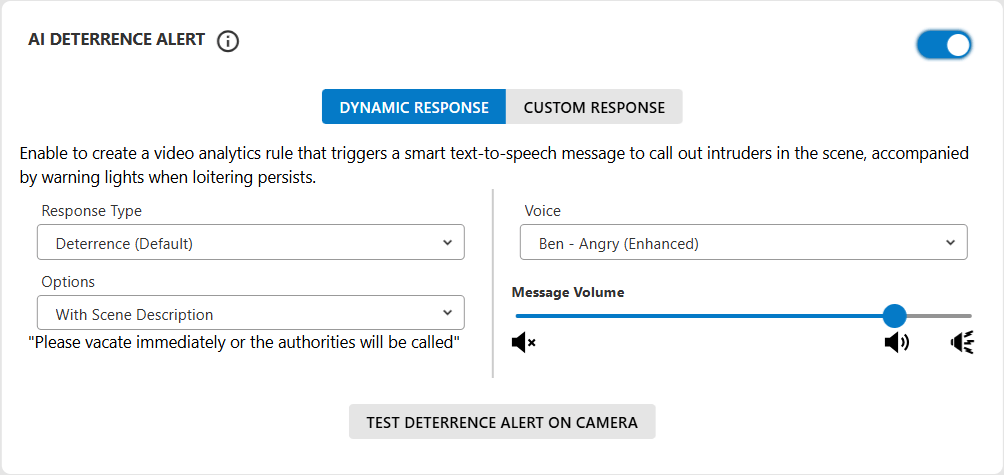
With Perimeter Guard, the doorbell can respond by itself when a rule fires: play a preset or custom message (“You’re on camera”), flash its light in a chosen pattern, or sound an audio alert — each with adjustable volume and duration. One caution from the field: the audio boost option extends range but can distort the message; at doorbell distance, standard volume is almost always the right call. Rules can also trigger connected lights — porch light on for any person after sunset is the setup we install most.
Our recommended starting point
For a typical Utah front door: one Ground Zone over the porch and approach, Person only, running at all times, with thumbnail notifications on and a one-minute clip delay — plus a disarmed-panel exception if you find it too chatty about your own comings and goings. Add a driveway tripwire for vehicles only if you actually act on arrival alerts. You can always tighten from there; start simple.
Interface images from the Alarm.com knowledge base, shown for customer reference.
Stuck, or want it dialed in for you?
If we installed your system, walking you through this is part of the deal — send us a message or call (928) 843-7767, and we’ll often just configure it remotely while you watch.
And if your current alarm company installed the doorbell but won’t help you use it: we take over existing Alarm.com systems across Utah — same equipment, month-to-month, with people who answer. More walkthroughs in our Alarm.com tutorial library.
Somebody new needs to use your Alarm.com system — a spouse, a cleaner, a property manager, the kid who just got a phone. Alarm.com gives you two completely different ways to let them in, and it is easy to want the wrong one. Here is the two-minute version, then the step-by-step for each.
A code and a login are different jobs
A code is the number somebody types to arm and disarm at the keypad, and to open any smart locks you give it. It lives on the panel, and it works whether or not that person owns a phone.
A login is an account for the app and website — for seeing cameras, checking history and getting notifications.
The rule of thumb: a cleaner who lets herself in on Tuesdays needs a code — one that opens the back door and disarms the panel, and nothing else. A spouse who wants the cameras on their phone needs a login. Family members usually end up with both.
Adding a user code
For anyone who needs to work the system in person — arming and disarming at the keypad, and unlocking any smart locks you enable the code on. You can do this from the app or the website.
In the app
- Open the Alarm.com app and tap the menu icon
- Go to Users, then tap add
- Enter their first and last name, then Create
- Type the code you want in the Access Code field
- Use the toggles to choose which partitions and locks the code works on
- Tap Save
On the website
- Sign in at your Alarm.com portal and click Users
- Click Add User
- Enter their name, then Create
- Enter the code in the Access Code field
- Toggle the devices the code should work on
- Click Save
Two things that catch people out. Codes cannot be changed while the system is armed — disarm first. And it takes a few minutes for a new code to reach the panel, so do not test it the second you hit save.
Adding an account login
For anyone who needs to see the system rather than operate the keypad. This one is the website only for the moment — Alarm.com have it in beta for the mobile app, so it should arrive there before long.
On the website
- Sign in at your Alarm.com portal and click Users
- Click Manage Logins, then Add a Login
- Enter their email address and a login name
- Choose the language, then Save
- Pick their permission level, then Save again
What the permission levels mean
- Master Control — everything, including creating more logins
- Full Control — everything except managing logins
- Read Only — can look, cannot change anything
- Limited Device Access — only the devices you name
- Custom — build it feature by feature
Worth knowing. Only a Master Control login can create other logins, so if the option is missing that is why. There is no limit on how many you make. New logins get an email with a link to set their own password — it expires after 24 hours, so send it when they are around to use it.
Stuck on any of it?
If we installed your system, walking you through this is part of the deal — send us a message or call (928) 843-7767.
And if your current alarm company doesn’t answer questions like this, that is fixable too: we take over existing systems across Utah — same equipment, better help.
When an IQ Panel starts chirping about a low battery — or reboots itself at random, or dies the moment the power blinks — the backup battery inside has usually reached the end of its life. Replacing it is a homeowner-doable job if you follow the power-down steps in order. Skipping them can corrupt the panel, so this is one tutorial where the sequence really matters.
Before you start
- Get the correct replacement battery for your exact panel model (IQ Panel 4 uses a specific Li-ion pack — if you’re a Shield customer, call us and we’ll have the right one waiting)
- You’ll need a small Phillips screwdriver
- Plan for the system to be down for about ten minutes
Step one: power the panel down properly
- Swipe down from the top of the screen, tap Settings → Advanced Settings
- Enter the code, then tap Power Down and confirm
- Wait until the screen and LEDs are fully off
- Unplug the panel’s power adapter from the wall outlet
Never just yank the battery on a running panel. An improper shutdown can corrupt the software and, per Qolsys, void the warranty. The two extra minutes are worth it.
Step two: open the panel and swap the battery
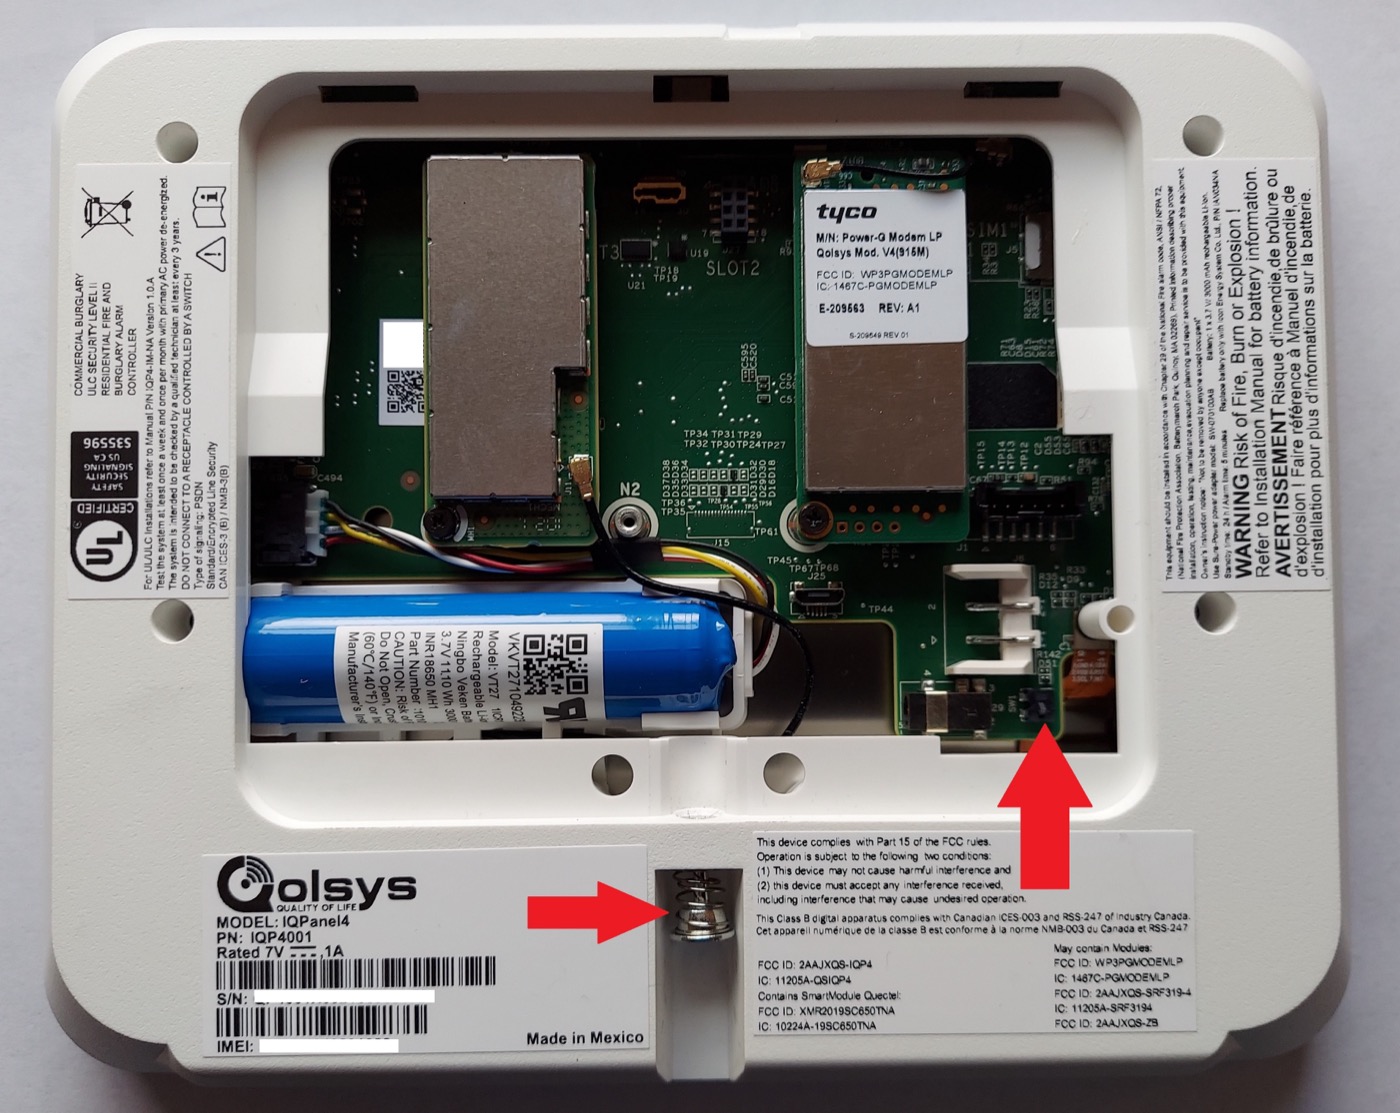
- Remove the small locking screw at the bottom of the panel and ease the panel off its backplate (or open the back compartment, depending on mounting)
- Unplug the battery’s 4-pin connector from the board — pull the connector, never the wires
- Lift the old battery out with a finger under its edge — no screwdrivers or sharp tools near the battery; it’s a lithium pack and doesn’t forgive punctures
- Seat the new battery, plug in the connector, and give the panel about two minutes to fully discharge and settle before powering up
Step three: power back up
- Reattach the panel to its backplate and replace the locking screw (snug, not cranked)
- Plug the power adapter back in — the panel boots on its own
- Once it’s up, check the status area: the low-battery alert should clear after the new battery charges for a while
Good to know
- Panel backup batteries live roughly 3–5 years; if yours is original and the panel is older than that, the battery is the first suspect for any flaky behavior.
- A loose locking screw after reassembly is the classic cause of a tamper alert — if you see one after the swap, that’s your fix.
- Old battery disposal: lithium packs go to battery recycling, not the trash — most home-improvement stores take them.
Rather we just did it?
Fair enough — it’s a ten-minute visit. Book a service window or call (928) 843-7767. And if the company that installed your panel wants $85 just to show up, we take over Qolsys systems across Utah with month-to-month monitoring and service that doesn’t feel like a penalty. More in the tutorial library.
“Panel Tamper” sounds alarming, but on a Qolsys IQ Panel it almost never means someone tampered with anything. It means the panel’s little anti-tamper switch — a spring that must stay compressed against the backplate — isn’t seated. Something as small as a loose locking screw sets it off. Here’s how to clear it in five minutes.
What actually causes it
- The panel isn’t fully latched onto its wall backplate — the most common cause by far
- The small locking screw (bottom of the panel) is loose or missing
- Something inside — often the backup battery — is slightly out of place, holding the cover open a hair
- The panel was recently opened (battery swap, moving it) and not quite reseated
How to clear it
- Press the panel gently against the wall — check all four edges for gaps between the panel and its backplate. You’re listening for the faint click of the tamper spring compressing.
- Check the locking screw at the bottom edge — replace it if missing, and tighten it snug (not cranked; overtightening flexes the case).
- If it was recently opened, take the panel off and reseat it once, making sure nothing inside — especially the battery and its cable — is bulging against the cover. The tamper spring sits near the bottom right on an IQ Panel 4 (bottom left on an IQ Panel 2).
- Acknowledge the alert: tap the message/status area at the top of the screen, open Alerts, find the Panel Tamper entry and acknowledge it. Once the switch is seated, the alert clears and stays cleared.
Sensor tampers are the same idea, smaller
A sensor tamper (door sensor, motion detector) means that device’s cover is open — usually after a battery change. Snap the cover fully closed, then acknowledge on the panel the same way.
If it keeps coming back
A tamper that returns after you’ve seated everything usually means a bent tamper spring, a warped backplate, or a panel that was mounted slightly off. That’s a quick service fix — book a window or call (928) 843-7767. And if your alarm company left you googling this instead of answering, we take over Qolsys and Alarm.com systems across Utah — no contract, real support. More walkthroughs in the tutorial library.
Panel frozen? Screen sluggish? Camera feeds refusing to load on the touchscreen? Nine times out of ten the fix is the same as every other computer in your life: reboot it. A Qolsys IQ Panel reboot is safe, keeps all your settings, and takes about two minutes. Here’s the right way — and the right way when the screen won’t respond at all.
The normal reboot (screen still responds)
- Swipe down from the top of the panel screen to open the menu
- Tap Settings, then Advanced Settings
- Enter your master code (the same code you use to disarm, if you’ve never set a separate one)
- Tap Panel Reboot, then confirm
The panel powers down and restarts on its own — give it a few minutes to fully come back and reconnect. Nothing is erased: sensors, codes, automations and monitoring all stay exactly as they were. This is a restart, not a factory reset.
The hard power cycle (screen is frozen)
If the touchscreen won’t respond at all, press and hold the small power button on the side/back of the panel for about 30 seconds, until the panel shuts off, then press it again to start it back up. Use this only when the soft reboot isn’t possible — the menu route is always gentler.
Good to know
- Monitoring during a reboot: the panel is offline for the couple of minutes it takes to restart. If your system is monitored, no need to call — a brief reboot won’t trigger anything.
- Reboot before you call anyone — slow panels, WiFi weirdness, sensors showing stale status and half the odd behaviors we get called about clear with a restart. It’s step one of every troubleshooting call we run.
- Frozen again within days? A panel that needs constant reboots usually has a real cause — commonly an aging backup battery (see our battery replacement tutorial) or a firmware update it never received. That’s worth a service visit.
Still stuck?
If we installed your system, call (928) 843-7767 or message us — we can often see the panel’s status remotely and fix it from here. If your current alarm company can’t (or won’t), we take over Qolsys and Alarm.com systems across Utah — no contract required. More walkthroughs in the tutorial library.
One of the most common questions we get after an install or a takeover: “the back door chimes every time it opens, but the front door says nothing — is something broken?” Nothing’s broken. On a Qolsys IQ Panel 4, chimes are set per sensor — every door and window has its own sound, its own voice announcement, or silence. Whoever set the system up simply left that sensor quiet. Two minutes at the panel fixes it.
Where the chime settings live
- Swipe down from the top of the panel screen to open the menu
- Tap Settings, then Advanced Settings
- Enter your master code — the same code you disarm with. No installer code needed for this one
- Tap Sound
The Sound menu is longer than it looks — volume sliders sit at the top, and the chime controls live further down under Edit Chimes and Chime Settings.
Give a door its chime — or change the sound
- Tap Edit Chimes. Every sensor on the system is listed by name
- Find the quiet one — say, Front Door — and tap the pencil icon next to it
- Pick a sound from the dropdown. There are a couple dozen, from classic ding-dongs to short beeps — and None, which is why your door was silent in the first place
- Tap Play to preview it out loud before you commit
- Tap Save
The same screen has a Voice option per sensor — turn it on and the panel speaks the sensor’s name (“front door”) when it opens. Chime, voice, both, or neither: every sensor is its own decision. This is also the trick in reverse — if the pantry door driving you crazy is the problem, set it to None and enjoy the quiet.
If nothing chimes at all
Scroll to the Chime Settings section of the same Sound menu. The master switches live there — if Sensor Chimes is unchecked, the panel stays silent no matter what the per-sensor settings say. Check it and the individual chimes come back.
Good to know
- Chimes are set at the panel, not in the app. The Alarm.com app can arm, disarm and automate nearly everything — but per-sensor chime sounds are configured on the touchscreen itself.
- Chimes set but still silent? Check the volume sliders at the top of the Sound menu — chime volume is separate from voices and beeps, and it’s the one that gets zeroed by accident.
- Chimes only play while the system is disarmed. Once you arm, an opening door starts an entry delay or an alarm instead — the chime isn’t a security feature, it’s a courtesy announcement.
- New sensors arrive with a default. Add a door later and it gets a standard chime — same menu to change or silence it.
Still stuck?
If we installed your system, call (928) 843-7767 or message us — happy to walk you through it on the phone, it really is two minutes. If your current alarm company won’t pick up for questions like this, that says something — we take over Qolsys and Alarm.com systems across Utah, no contract required. More walkthroughs in the tutorial library.